Poradnik - proste pomysły na super efekty

wszystko o modelach kartonowych

Moderatorzy: laszlik, kartonwork, Tomasz D.

ODPOWIEDZ
Awatar użytkownika
Syzyf
Posty: 735
Rejestracja: wt lis 30 2004, 10:46
x 2

  • Cytuj
  • zaloguj się, by polubić ten post

Post autor: Syzyf »

Nikolas-A pisze:Hello! Can you translate this text on english?
I'll try with the Google translator ;)

-----------------------------------------------------
Gluing thin and long tubes

Example: tube about the diameter of 2,2 mm and the length of 26 cm glued together to the narrow bookmark :
Obrazek

___________________________________
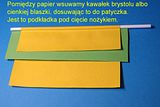
The main role is played here a ruler. Here is the recipe:
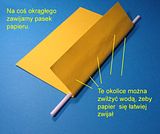
- (the left photo): we are winding a strip of paper on something round.
These areas (dashes) can be moistened with water to more easily wrapped paper
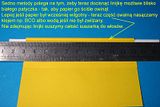
- (right): you have to push the ruler as close to the white stick to it tightly wrapped paper (better that the paper was slightly damp)
Moistened with water (or liquid glue) the oval portion of the paper.
Dry it with a hair dryer (not removing the ruler):
Obrazek Obrazek

______________________________
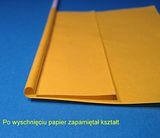
- (left): after drying, the paper retains shape
- (right): slide a piece of card stock (or thin plates) between the paper aligning it to stick. It is a pad for the blade of knife:
Obrazek Obrazek

________________________
- (left): put a ruler and knife cut the unnecessary paper strip
- (right): wet brush push the edge (it is not always necessary or possible)
Obrazek Obrazek

_________________________________
- (left): again with a ruler to cut unnecessary strip. Inside spread glue
- (rihgt): glue tab (roll on something soft or press with your fingers)
Obrazek Obrazek

_______________________________
Done :)
Obrazek

________________________________

Contact gluing cylinder
- (left part): glue a strip of paper to something in the shape of a cylinder (with a transparent adhesive tape). Line is the edge of the sheet after winding
- (between): on the right side of the line put a wet sheet of card stock (to do a cylinder). Then roll it like roulade cake.
- (right): leave to dry (a few hours)
Obrazek

_________________________________
- (left): after drying
- (right): you can paste into the plywood paper
Obrazek

__________________________________
A similar method can be rolled thin tube (orange paper). A thin strip of paper glued to a thin rod (eg. a wire, spoke)

Obrazek

____________________________________
- (top): put a wet paper strip (orange) parallel to the instrument
- (between): collapse and leave for a few minutes
- (down): slightly expand and extend the tube
Obrazek

_____________________________________
tube onto the wire to dry and glue on the pin:
Obrazek
____________________________________
You can also glue like the original part of the paper model:
Obrazek

_____________________________________
The extreme example :lol: : cigarette paper tube about the diameter of 0,4 mm and the length of 50 mm (will fit inside a medical needle with a diameter of 0.7 mm).
Obrazek
Moje modele: archiwum
Nikolas-A
Posty: 5
Rejestracja: śr paź 31 2012, 9:04
Lokalizacja: Russia

  • Cytuj
  • zaloguj się, by polubić ten post

Post autor: Nikolas-A »

Syzyf pisze:
Nikolas-A pisze:Hello! Can you translate this text on english?
I'll try with the Google translator ;)

-----------------------------------------------------
Gluing thin and long tubes

Example: tube about the diameter of 2,2 mm and the length of 26 cm glued together to the narrow bookmark :
Obrazek

___________________________________
The main role is played here a ruler. Here is the recipe:
- (the left photo): we are winding a strip of paper on something round.
These areas (dashes) can be moistened with water to more easily wrapped paper
- (right): you have to push the ruler as close to the white stick to it tightly wrapped paper (better that the paper was slightly damp)
Moistened with water (or liquid glue) the oval portion of the paper.
Dry it with a hair dryer (not removing the ruler):
Obrazek Obrazek

______________________________
- (left): after drying, the paper retains shape
- (right): slide a piece of card stock (or thin plates) between the paper aligning it to stick. It is a pad for the blade of knife:
Obrazek Obrazek

________________________
- (left): put a ruler and knife cut the unnecessary paper strip
- (right): wet brush push the edge (it is not always necessary or possible)
Obrazek Obrazek

_________________________________
- (left): again with a ruler to cut unnecessary strip. Inside spread glue
- (rihgt): glue tab (roll on something soft or press with your fingers)
Obrazek Obrazek

_______________________________
Done :)
Obrazek

________________________________

Contact gluing cylinder
- (left part): glue a strip of paper to something in the shape of a cylinder (with a transparent adhesive tape). Line is the edge of the sheet after winding
- (between): on the right side of the line put a wet sheet of card stock (to do a cylinder). Then roll it like roulade cake.
- (right): leave to dry (a few hours)
Obrazek

_________________________________
- (left): after drying
- (right): you can paste into the plywood paper
Obrazek

__________________________________
A similar method can be rolled thin tube (orange paper). A thin strip of paper glued to a thin rod (eg. a wire, spoke)
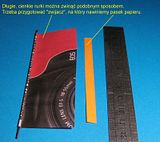
Obrazek

____________________________________
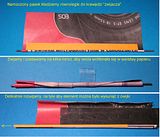
- (top): put a wet paper strip (orange) parallel to the instrument
- (between): collapse and leave for a few minutes
- (down): slightly expand and extend the tube
Obrazek

_____________________________________
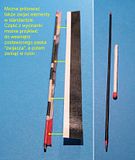
tube onto the wire to dry and glue on the pin:
Obrazek
____________________________________
You can also glue like the original part of the paper model:
Obrazek

_____________________________________
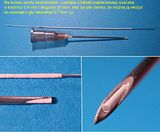
The extreme example :lol: : cigarette paper tube about the diameter of 0,4 mm and the length of 50 mm (will fit inside a medical needle with a diameter of 0.7 mm).
Obrazek
Thank you! I try to understand. In Poland the most incredible modelers, take off my hat.
Nikolas-A
Posty: 5
Rejestracja: śr paź 31 2012, 9:04
Lokalizacja: Russia

  • Cytuj
  • zaloguj się, by polubić ten post

Post autor: Nikolas-A »

I understood as to roll, but do not understand how to glue, all stick together! I have curved hands... :)
Alski
Posty: 16
Rejestracja: pn mar 04 2013, 7:46

na pół

  • Cytuj
  • zaloguj się, by polubić ten post

Post autor: Alski »

A jak teraz ją przeciąc na 2 symetryczne połowy ?
Awatar użytkownika
Łukasz_G
Posty: 93
Rejestracja: czw sty 12 2006, 17:37
Lokalizacja: Piaski

  • Cytuj
  • zaloguj się, by polubić ten post

Post autor: Łukasz_G »

Witam.
Odkopię trochę temat. Ostatnio borykam się ze skutecznym czyszczeniem pędzelków po malowaniu. Problem nie polega na tym aby dokładnie wyczyścić pędzelek a wyczyszczeniem go tak aby się nie "rozpapciały". Używam farb humbrol i pactra.
Liczę na poradę doświadczonych kolegów.

Jeśli moje pytanie jest w niewłaściwym miejscu proszę o przeniesienie.

Pozdrawiam.
Iveco TurboStar - ukończony
Jelcz C-423 - w budowie
Awatar użytkownika
wk82
Posty: 719
Rejestracja: wt lip 19 2005, 19:49
Lokalizacja: Sandomierz

  • Cytuj
  • zaloguj się, by polubić ten post

Post autor: wk82 »

Witam,

wydaje mi się, że żywotność pędzelków i tak jest ograniczona. Tak czy inaczej wydaje mi się, że moje sporo czasu wytrzymują w miarę dobrym stanie :) stąd pozwolę sobie odpowiedzieć na Twoje pytanie.
Jeśli chodzi o farbki Pactra to tutaj nie widzę absolutnie żadnego problemu z czyszczeniem - wystarczy opłukać pędzelek pod bieżącą wodą.
Po malowaniu Humbrolem wylewam trochę terpentyny balsamicznej na papier toaletowy i natychmiast wycieram pędzel.
Metody te sprawdzają się i są chyba najprostsze z możliwych :)

Pozdrawiam Serdecznie
Moje relacje:
www.kartonwork.pl/forum/viewtopic.php?t=(XXXXX)
UKOŃCZONE:
Przyczepa PN 1,5 (8691); Schienenwolf (15903); H.L. Hunley (12780); Katapulta (12916); T-24 (13216); TKW (14149); Kapliczka (14675); Ł-34
W BUDOWIE:
P. Kolei Wilanowskiej; BM-13 "Katiusza"
krzy65siek
Posty: 22
Rejestracja: ndz lip 26 2009, 22:10

  • Cytuj
  • zaloguj się, by polubić ten post

Post autor: krzy65siek »

Pędzelek po farbach olejnych i po wymyciu dokładnym rozcieńczalnikiem, trzeba umyć wodą z mydłem. Włoski przestaną być kruche i wytrzymają dłużej.

Pozdrawiam
Krzysiek
krzy65siek
Posty: 22
Rejestracja: ndz lip 26 2009, 22:10

  • Cytuj
  • zaloguj się, by polubić ten post

Post autor: krzy65siek »

Pędzelek po farbach olejnych i po wymyciu dokładnym rozcieńczalnikiem, trzeba umyć wodą z mydłem. Włoski przestaną być kruche i wytrzymają dłużej.

Pozdrawiam
Krzysiek
gargo
Posty: 79
Rejestracja: czw kwie 16 2009, 12:10
x 1

  • Cytuj
  • zaloguj się, by polubić ten post

Post autor: gargo »

Zmywacz do farb akrylowych Wamod. Działa świetnie. Jest trochę tłustawy i nie trzeba już dodatkowo używać mydła.
Ukończono: 401Ra,408S,105N,Wddo,SM03,Żuraw wodny,401Z,408W, 436V,WM-15A,Semafor, 406Ra,
PZL- Bryza, SM42,
Na warsztacie: SM15, 408W Cargo
Awatar użytkownika
wlodi
Posty: 94
Rejestracja: wt lut 14 2012, 12:55
Lokalizacja: Severodvinsk

  • Cytuj
  • zaloguj się, by polubić ten post

Post autor: wlodi »

A ja do tematu chciałbym dorzucić trochę o siateczce do łaczeń płyt gipsowych. Takie siatki są w różnej wielkości i świetnie się nadają na relingi na przykład lub różnego rodzaju kraty jak i drabinki. fajnie się to tnie i siatka jest w miarę sztywna w porównaniu do firanek :lol: Polecam leniuchom którym się nie chce z drutami bawić :D Mam zamiar w swoim piorunie nie żałować tejże siateczki.
POZDRAWIAM
Martinez
ODPOWIEDZ